

Like with every other Pokémon Mystery Dungeon game, there is a special hub that connects all the various areas to the dungeons, and provides a certain amount of services. However, in this game, the hub area known as Pokémon Paradise, offers a massive range of services, and has a twist.
| Post Town | |||||||||||||||||||||||||
The town is the focal point on the hub area, as always with Pokémon Mystery Dungeon games. This town has got a variety of stalls of Pokémon to interact with, and features many Pokémon who interact with you throughout the story. This will be the place you frequent most in the game
|
 |
||||||||||||||||||||||||
| Pokémon Paradise | |||||||||||||||||||||||||
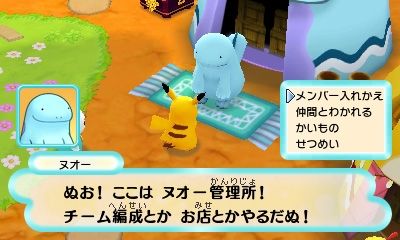
The Pokémon Paradise also has a hub area. This area provides a variety of services for you and also don't change much. Unlike Post Town, however, it will have various Pokémon you have recruited dotted around the area
|
 |
||||||||||||||||||||||||
| Ranking Up | |||||||||||||||||||||||||
One of the unique parts about the Pokémon Paradise is the ability to rank up. Instead of your team getting a special rank which is increased, it is instead the Pokémon Paradise which increases in rank. Increasing this rank will give you a variety of items, materials and even give you access to more stores.
When you reach Perfect Rank, you will be able to teach your main Pokémon the special moves of Frenzy Plant, Blast Burn, Hydro Cannon, Volt Tackle or Draco Meteor, depending upon the Pokémon you |
|
||||||||||||||||||||||||
| Customisation | |||||||||||||||||||||||||
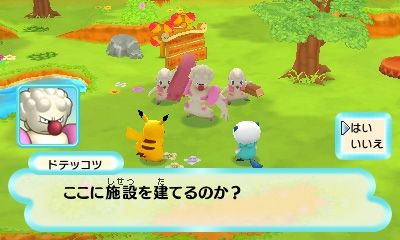
The main part of the Pokémon Paradise is an area where you can customise. While you start off with just the house, you have the ability to increase the area thanks to Gurdurr. You start off being able to excavate each individual area adjacent to your home, but this starts expanding on and on until you have filled all nine areas. There are four different types of area you can create, each with four possible stores. However, the amount of areas you run helps determine the maximum amount of Pokémon you can recruit.
|
 |
||||||||||||||||||||||||
| Mini-Games | |||||||||||||||||||||||||
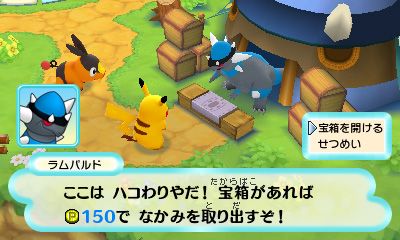
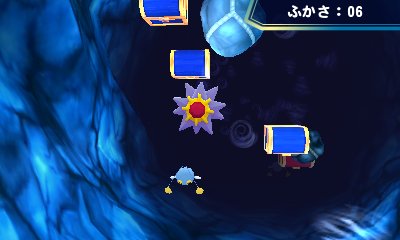
Two of the stores you can create in the Pokémon Paradise provide minigames for you to participate in. These mini-games have you play through in order to obtain various items. These items are usually very rare, with all the evolution items being exclusively obtainable within them. There are no limits to how much you can play them, but it does cost 100P per play Beartic Hockey Salvage Treasure |
 |
||||||||||||||||||||||||
| Custom Stores | |||||||||||||||||||||||||
As you rank up the area, you get access to a variety of stores. These stores vary from having a Lottery, to allowing you to purchase items or recycling items. Each area can have four stores running at once, and the stores can then be upgraded. To build these stores, and upgrade them, you need to earn materials from completing various missions. In addition to the stores, you can also open various gardens. These gardens allow you to grow various seeds and berries including Revive Seeds. Finally, there are also dojos for each type. These run in a similar way to the store in Post Town, but increase the level of the moves even further than before. However, if you have an empty facility, a Drilbur may appear near there and will offer to dig treasure for you, giving you access to a Level 5 dungeon filled with rare items |
 |
||||||||||||||||||||||||
Below is a full list of stores you can create. These are all built with materials you get for completing missions on the bulletin board and can be upgraded and repainted at the sign outside of each of them
| Store Name | Description | Cost | Rank Requirement | Upgrade Cost | Second Upgrade Cost |
| Berry & Seed Store | Sells various Berries & Seeds | 300 Rich Soil * 2 Precious Branch * 2 | Normal Rank | 600 Ancient Soil * 3 Heavy Lumber * 3 | 1000 Rare Soil * 4 Fine Log * 4 |
| Elite Boutique | Sells various Orbs and miscellaneous items | 900 Sturdy Vine * 2 Fresh Herb *2 | Gold Rank | 600 Hardy Vine * 3 Leaf Bouquet *3 | 1000 Everlasting Vine * 4 Grass Veil * 4 |
| Oodles of Orbs | Sells various randomised items. Often has sales on the items, selling at very low prices. | 1000 Sturdy Vine * 1 Fresh Herb * 1 | Platinum Rank | 600 Hardy Vine * 1 Leaf Bouquet * 1 | 1000 Everlasting Vine * 1 Grass Veil *1 |
| Swap Shop | Offers trades for various items such as Berries & Orbs | 300 Precious Branch * 2 Lustrous Metal * 2 Hard Fragment * 2 Sturdy Vine * 2 Reverse Herb * 2 | Gold Rank | 600 Heavy Lumber * 3 Glimmering Alloy * 3 Unbreakable Rock * 3 Hardy Vine * 3 Leaf Bouquet * 3 | 1000 Fine Log * 4 Gilded Metal * 4 Endless Stone * 4 Everlasting Vine * 4 Grass Veil * 4 |
| Prize Palace | Allows you to purchase and exchange tickets for random prizes | 300 Lustrous Metal * 2 Sturdy Vine * 2 | Bronze Rank | 600 Reflective Alloy * 3 Hardy Vine * 3 | 1000 Gilded Metal * 4 Everlasting Vine * 4 |
| Side-road Guide | Tells of a special location inside a Dungeon | 300 Rich Soil * 2 Precious Branch * 2 | Silver Rank | 600 Ancient Soil * 3 Heavy Lumber * 3 | 1000 Rare Soil * 4 Fine Log * 4 |
| Music Paradise | Allows for various music to be played in the Pokémon paradis | 4500 Rare Soil * 3 Endless Stone * 3 Gilded Metal * 3 Fine Log * 3 | Complete game | ||
| Beartic Hockey | Allows you to play a mini-game to win prizes such as evolution items | 3000 Rich Soil * 3 Hard Fragment * 3 Lustrous Metal * 3 | Gold Rank | ||
| Salvage Treasure | Allows you to play a mini-game to win prizes such as evolution items | 300 Precious Branch * 3 Reverse Herb * 3 Spring Water * 3 | Bronze Rank | ||
| Oran Field | Grows Oran Berries | 300 Rich Soil * 2 Oran Berry * 1 | Normal Rank | 600 Ancient Soil * 3 Oran Berry * 2 | 1000 Rare Soil * 4 Oran Berry * 3 |
| Heal Field | Grows Heal Seeds | 300 Rich Soil * 3 Spring Water * 3 Heal Seeds * 2 | Platinum Rank | 600 Ancient Soil * 4 Well Water * 4 Heal Seed * 3 | 1000 Rare Soil * 5 Rainbow Drops * 5 Heal Seed * 4 |
| Revive Field | Grows Revive Seeds | 300 Rich Soil * 3 Spring Water * 3 Revive Seeds * 2 | Diamond Rank | 600 Ancient Soil * 4 Well Water * 3 Reviva Seed * 3 | 1000 Rare Soil * 6 Rainbow Drops * 6 Revive Seed * 6 |
| Eyedrop Field | Grows Eyedrop Seeds | 300 Rich Soil * 2 Spring Water * 2 Eyedrop Seeds * 2 | Normal Rank | 600 Ancient Soil * 3 Well Water * 3 Eyedrop Seed * 3 | 1000 Rare Soil * 4 Rainbow Drops * 4 Eyedrop Seed * 4 |
| Warp Field | Grows Warp Seeds | 300 Rich Soil * 2 Spring Water * 2 Warp Seeds * 2 | Silver Rank | 600 Ancient Soil * 3 Well Water * 3 Warp Seed * 3 | 1000 Rare Soil * 4 Rainbow Drops * 4 Warp Seed * 4 |
| Swift Field | Grows Swift Seeds | 300 Rich Soil * 2 Spring Water * 2 Swift Seeds * 2 | Silver Rank | 600 Ancient Soil * 3 Well Water * 3 Swift Seed * 3 | 1000 Rare Soil * 4 Rainbow Drops * 4 Swift Seed * 4 |
| Blind Field | Grows Blind Seeds | 300 Rich Soil * 2 Spring Water * 2 Blind Seeds * 2 | Bronze Rank | 600 Ancient Soil * 3 Well Water * 3 Blind Seed * 3 | 1000 Rare Soil * 4 Rainbow Drops * 4 Blind Seed * 4 |
| Totter Field | Grows Totter Seeds | 300 Rich Soil * 2 Spring Water * 2 Totter Seeds * 2 | Bronze Rank | 600 Ancient Soil * 3 Well Water * 3 Totter Seed * 3 | 1000 Rare Soil * 4 Rainbow Drops * 4 Totter Seed * 4 |
| Sleep Field | Grows Sleep Seeds | 300 Rich Soil * 2 Spring Water * 2 Sleep Seeds * 2 | Bronze Rank | 600 Ancient Soil * 3 Well Water * 3 Sleep Seed * 3 | 1000 Rare Soil * 4 Rainbow Drops * 4 Sleep Seed * 4 |
| Bound Field | Grows Bound Seeds | 300 Rich Soil * 2 Spring Water * 2 Bound Seeds * 2 | Bronze Rank | 600 Ancient Soil * 3 Well Water * 3 Bound Seed * 3 | 1000 Rare Soil * 4 Rainbow Drops * 4 Bound Seed * 4 |
| Communication Field | Grows Communication Seeds | 300 Rich Soil * 3 Spring Water * 3 Communication Seeds * 2 | Gold Rank | 600 Ancient Soil * 4 Well Water * 4 Commuication Seed * 3 | 1000 Rare Soil * 5 Rainbow Drops * 5 Communication Seed * 4 |
| Encourage Field | Grows Encourage Seeds | 300 Rich Soil * 3 Spring Water * 3 Encourage Seeds * 2 | Gold Rank | 600 Ancient Soil * 4 Well Water * 4 Encourage Seed * 3 | 1000 Rare Soil * 5 Rainbow Drops * 5 Encourage Seed * 4 |
| Blast Field | Grows Blast Seeds | 300 Rich Soil * 2 Spring Water * 2 Blast Seeds * 2 | Normal Rank | 600 Ancient Soil * 3 Well Water * 3 Blast Seed * 3 | 1000 Rare Soil * 5 Rainbow Drops * 5 Blast Seed * 5 |
| Violent Field | Grows Violent Seeds | 300 Rich Soil * 3 Spring Water * 3 Violente Seeds * 2 | Platinum Rank | 600 Ancient Soil * 4 Well Water * 4 Violent Seed * 3 | 1000 Rare Soil * 5 Rainbow Drops * 5 Violent Seed * 4 |
| Pure Field | Grows Pure Seeds | 300 Rich Soil * 2 Spring Water * 2 Pure Seeds * 2 | Master Rank | 600 Ancient Soil * 3 Well Water * 3 Pure Seed * 3 | 1000 Rare Soil * 6 Rainbow Drops * 6 Pure Seed * 6 |
| Vile Field | Grows Vile Seeds | 300 Rich Soil * 2 Spring Water * 2 Vile Seeds * 2 | Diamond Rank | 600 Ancient Soil * 3 Well Water * 3 Vile Seed * 3 | 1000 Rare Soil * 5 Rainbow Drops * 5 Vile Seed * 5 |
| Normal Dojo | Trains up Normal-type moves | 300 Lustrous Metal * 2 Hard Fragments * 2 | Normal Rank | 600 Reflective Alloy * 5 Unbreakable Rock * 5 | 1000 Gilded Metal * 7 Endless Stone * 7 |
| Fire Dojo | Trains up Fire-type Moves | 300 Lustrous Metal * 2 Hard Fragments * 2 | Normal Rank | 600 Reflective Alloy * 5 Unbreakable Rock * 5 | 1000 Gilded Metal * 7 Endless Stone * 7 |
| Grass Dojo | Trains up Grass-type Moves | 300 Lustrous Metal * 2 Hard Fragments * 2 | Normal Rank | 600 Reflective Alloy * 5 Unbreakable Rock * 5 | 1000 Gilded Metal * 7 Endless Stone * 7 |
| Water Dojo | Trains up Water-type Moves | 300 Lustrous Metal * 2 Hard Fragments * 2 | Normal Rank | 600 Reflective Alloy * 5 Unbreakable Rock * 5 | 1000 Gilded Metal * 7 Endless Stone * 7 |
| Electric Dojo | Trains up Electric-type Moves | 300 Lustrous Metal * 2 Hard Fragments * 2 | Normal Rank | 600 Reflective Alloy * 5 Unbreakable Rock * 5 | 1000 Gilded Metal * 7 Endless Stone * 7 |
| Ice Dojo | Trains up Ice-type Moves | 300 Lustrous Metal * 2 Hard Fragments * 2 | Normal Rank | 600 Reflective Alloy * 5 Unbreakable Rock * 5 | 1000 Gilded Metal * 7 Endless Stone * 7 |
| Fighting Dojo | Trains up Fighting-type Moves | 300 Lustrous Metal * 2 Hard Fragments * 2 | Normal Rank | 600 Reflective Alloy * 5 Unbreakable Rock * 5 | 1000 Gilded Metal * 7 Endless Stone * 7 |
| Poison Dojo | Trains up Poison-type Moves | 300 Lustrous Metal * 2 Hard Fragments * 2 | Normal Rank | 600 Reflective Alloy * 5 Unbreakable Rock * 5 | 1000 Gilded Metal * 7 Endless Stone * 7 |
| Ground Dojo | Trains up Ground-type Moves | 300 Lustrous Metal * 2 Hard Fragments * 2 | Normal Rank | 600 Reflective Alloy * 5 Unbreakable Rock * 5 | 1000 Gilded Metal * 7 Endless Stone * 7 |
| Flying Dojo | Trains up Flying-type Moves | 300 Lustrous Metal * 2 Hard Fragments * 2 | Normal Rank | 600 Reflective Alloy * 5 Unbreakable Rock * 5 | 1000 Gilded Metal * 7 Endless Stone * 7 |
| Psychic Dojo | Trains up Psychic-type Moves | 300 Lustrous Metal * 2 Hard Fragments * 2 | Normal Rank | 600 Reflective Alloy * 5 Unbreakable Rock * 5 | 1000 Gilded Metal * 7 Endless Stone * 7 |
| Bug Dojo | Trains up Bug-type Moves | 300 Lustrous Metal * 2 Hard Fragments * 2 | Normal Rank | 600 Reflective Alloy * 5 Unbreakable Rock * 5 | 1000 Gilded Metal * 7 Endless Stone * 7 |
| Rock Dojo | Trains up Rock-type Moves | 300 Lustrous Metal * 2 Hard Fragments * 2 | Normal Rank | 600 Reflective Alloy * 5 Unbreakable Rock * 5 | 1000 Gilded Metal * 7 Endless Stone * 7 |
| Ghost Dojo | Trains up Ghost-type Moves | 300 Lustrous Metal * 2 Hard Fragments * 2 | Normal Rank | 600 Reflective Alloy * 5 Unbreakable Rock * 15 | 1000 Gilded Metal * 7 Endless Stone * 7 |
| Dragon Dojo | Trains up Dragon-type Moves | 300 Lustrous Metal * 2 Hard Fragments * 2 | Normal Rank | 600 Reflective Alloy * 5 Unbreakable Rock * 5 | 1000 Gilded Metal * 7 Endless Stone * 7 |
| Dark Dojo | Trains up Dark-type Moves | 300 Lustrous Metal * 2 Hard Fragments * 2 | Normal Rank | 600 Reflective Alloy * 5 Unbreakable Rock * 5 | 1000 Gilded Metal * 7 Endless Stone * 7 |
| Steel Dojo | Trains up Steel-type Moves | 300 Lustrous Metal * 2 Hard Fragments * 2 | Normal Rank | 600 Reflective Alloy * 5 Unbreakable Rock * 5 | 1000 Gilded Metal * 7 Endless Stone * 7 |